How to make more money in less time, the year of the tech and the “flow” of glue pulling. La Nina brings lots of hail to the U.S.
Last year was one of the slowest years on record for hail damage. There were just a couple of good size storms.
This year couldn’t be more different. There have been several weeks where the hail reports had multiple days of 200 plus reports. Some towns have been hit twice.
The weather experts say its due to a La Nina weather pattern causing unusual amounts of rotating storms. I don’t know, but I like it.
A technician told me this is the year to work 3 weeks, grab the low hanging fruit and move on.
A broker – manager called this “The year of the tech”.
I enjoy the excitement of hearing about storms. It is a terrible event for the customers to be sure. Aren’t you pleased to be available to help out?
American financial guru Suze Orman says we should save our bucks in a good year, you never know what next season will bring.
If you live in a no-hail region, this is the year to look for chances to join a team and do some high volume pushing, even if for just a couple of weeks.
I’ve had some excellent techs to help out. By observing their habits, I have noticed some commonalities which lead to speed and efficiency in pushing.
These two qualities lead to more money and will help you make the best use of your time spent away from the family.
Read on.
You need a system
This applies equally to door dings and hail damage.
If you have a car with dents on eight side panels, how do you fix it fast without missing a dent?
I call it walking down the sides.
The most efficient is to have your light towards the rear of the car and you to the front. Touch every dent possible you can before changing the light orientation.
For example, if you start at the rear door, its likely you’ll only cover the rear half of that door with your light like this. The exception is when you can work through the electrical wire pass through hole in the front of this panel.
You’ll want to flip your light around and finish the panel from the other direction, but I can tell you its faster if you don’t. Keep your light toward the rear and you to the front of car and move on to the front door. Do this even if it means leaving dents and dents which need cross checking still in the back door. You’ll come back to this in a bit.
Now move to the front door and repeat. Work all you can and move up to the fender. Work all you can through the wheel opening from front to rear. Now see what you can get by taking out the side marker lamp or headlight if necessary.
Your light should still be oriented to the rear, and you to the front.
Once you have worked all possible, only now should you flip the light around and work over the panels again.
This time your light will be to the front and you will be to the rear facing forward into the light. Now you can pick up whatever was missed and cross check the work already done.
Work the fender again if necessary, this time going through the opening by the door hinge if there is one.
Repeat for the doors.
Likely this will be the first time you touch the quarter panel as these usually can’t be worked from anywhere but through the trunk, unless you drilled in the jamb. These days, we don’t do much of this.
The efficiency of this repair system comes in the discipline of moving your light the least amount possible. It also comes in the form of complete confidence that what you just repaired is the best it can be. If a side panel looks good in two directions, what more can you ask?
Don’t skip the big scary dents
I have noticed some techs will completely ignore a big dent even when its positioned perfectly in the light.
“I’m saving the worst for last” is the reason why, I guess.
You must touch it. Get started. Well begun is half done.
If it is a big gnarly, it will likely require being worked from at least two and maybe more directions. Might as well start while its in the light. Even if its not easy, or you have to reach for another tool, push away.
The reasons for this are of course, to be efficient, but there is a more esoteric reason as well.
Psychologically, emotionally, you are affected by what you just left untouched. Read: slowed down.
When a technician get crudded out about a vehicle, its usually due to the time spent on it.
We all want to move on to the next one, to get to the feeling of done as fast as possible.
If you leave the one dent untouched, its zapping your energy. You might argue this, but believe me, I’ve seen it. Subconsciously, your mind and body know its still there.
I’ve witnessed the balloon of self confidence slowly deflate as a tech moves around a car knowing he has to come back to a dent.
The reason for leaving the dent?
Fear. Fear of your skills not being good enough to conquer it, yes, but it goes deeper.
Its root lies in perfectionism. The big nasty dent is put off because at the end of the repair, it will have to be inspected and pass muster.
Perfectionists fear the inspection, so we put off the dent.
I believe you must begin the dent. I also feel there are times when you should leave a dent that’s not working well.
Sometimes, a dent does not behave as we would like. So we move on, at least for now.
Notice here this dent was started, then put aside.This time, the emotional price paid for continuing to fight it is too high, so come back later.
Just don’t ignore it when your light is in the right position to work it the first time.
Speed and efficiency go hand in hand. The money is in both and comes from making the least amount of steps, and the least amount of light adjustments you can.
Yes, these are minor and you might say its easy to move your light.
This is true, but we are talking about a car with multiple dents in many panels. Each time you reorient your light adds up. The small things snowball into big time savings or time wasted at the end of the repair.
Movement equals money. Keep the eyes and mind fresh by flowing around the car and you’ll feel better.
I promise.
Tech tips:
Glue pulling sharp dents
The recent hailstorm here is a challenge for glue pulling skills.
The hail had jagged, sharp edges and so the dents have a sharp bottom to them. These are not the rounded bottom, single pull kind of dents.
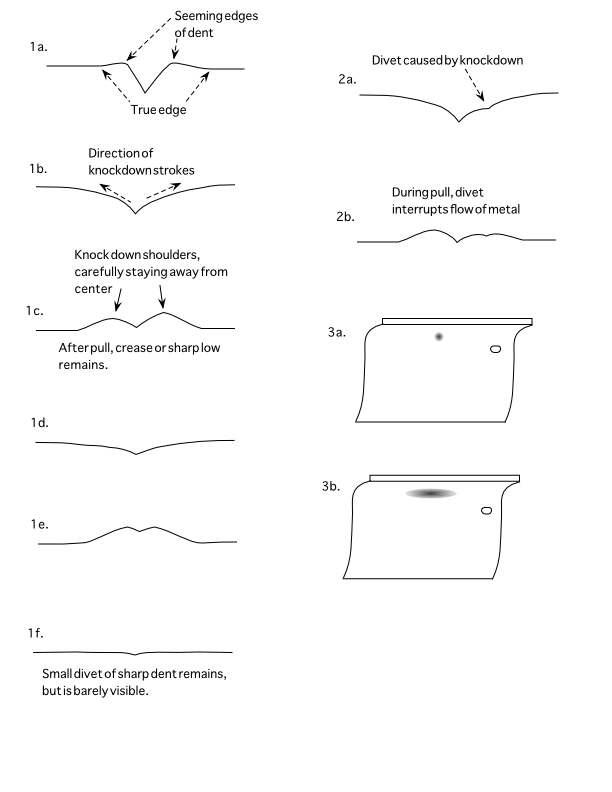
In the illustration above, you can see a side view of this kind of dent.
Glue pulling is an art form all to itself. You can think of it as replacing all the tiny pushes you might do from behind with one big push using a very blunt tool instead. Can you imagine the mess this might leave?
I like to think of it as “make it all go high and let me smooth it out afterwards.”
We still use vibration, but most of it happens from the top in glue pulling. Think of it as a sudden shock from the top.
The focused, careful knockdown on a very high overpull is what is required for shrinking a sharp dent without pushing from behind.
It can take pull after pull and seem as though not much is happening.
Remember what its like to push on a sharp dent? As long as its sharp and low, its way more resistant to your pushing. The stretched metal in the bottom of the dent makes it very stiff and doesn’t want to move.
Same with the sharp low when pulling. While it may seem like not much is happening, eventually, the middle will begin to let go.
Best to think of this operation as “flowing” the metal back into shape.
You are smoothing out the highs and staying off the lows while knocking down. Then you pull it all high once again.
Each pull, or shock, will result in a different shaped result. The difference is due to the release of tension you made possible with your vibrations while knocking down the ridges. Now the metal can flow to a point of closer to being done.
Eventually you’ll be left with a completely smooth area or perhaps just a small divot where the middle of the crease or sharp point was.
Take a look at figure 1a. This is a cross section of a sharp dent prior to pulling. If you go ahead and pull now, not much will happen. So if you can tell in the light the dent is sharp, you’ll save time by relieving the highs and sharp shoulders which block the flow of the metal from being worked.
In fig. 1b. you get a glimpse of what this will look like when smoothed. The tip of your knockdown can go right next to the sharp point, but not right in it. You already know hitting right on the sharp point will only make it sharper. Work from the middle out so you can get a feel for when it is relaxing.
You notice the dent spreads out more than it did at first, but its fine, you’ll pull it back up soon enough.
In 1c. this is the look after your first pull. Notice the shoulders come up once again, but the middle remains. Now you have what we call the “volcano” look. The center remains because it blocks the flow of the metal grains.
You know this is true because you can picture what a glue puller will do to a non dented area if you pulled it. It will be a perfectly domed high that would easily flow back to level under your skilled hammering.
Again, after your first pull, you will take down the shoulders once again, continuing to stay off the sharp center.
Hopefully you have something left like the illustration in fig. 1d.
One more pull and the result will look like 1e. Again, the volcano effect is visible in your light, but much smaller this time.
We are encouraged now because we have hope this might be last pull. If you are careful and watch diligently as you read the metal with your light, 1f. will be your result.
Notice it is mostly level, but a tiny point of the sharp remains. If you are a perfectionist like me, you can’t leave it alone and you’ll go one more pull. Even if this is the best you get, you have done very well and have a result you can sell. Even the trained body shop eye will be happy here.
Wish I could tell you its removable every time, but its not.
The alloy of the metal and the degree of sharpness will determine the outcome. It won’t be your lack of skills or desire to overcome this stubborn point that stops you.
Which leads to why divots created by your knockdown are bad.
In fig 2a. the same dent which was smoothed out has a point on the left where the hammer stroke was too hard and a divot was made.
In fig. 2b., you can see the result of the pull was greatly affected by the mistaken divot.
Again, it all has to do with flow. The divot interrupted the flow on the right and the resulting pull was limited on this side. Never fear, even as you can smooth out a sharp dent, you can also smooth out your divots, most of the time.
Your eyes will be able to see tiny differences in the surface of the metal when its high and as it starts to level out. But training your eyes with pushing is essential.
For a few years, I have exclusively used the slide hammer. The mini Lifter sat on the bottom of my cart. Either will work, but the mini lifter stops the snap or shock of the glue tab from spreading out and concentrates it at the dent. This can be a big help, especially on a dent with a particularly nasty, sharp bottom.
Be careful as sometimes when a tab is really stuck, you can actually dent around the tab with the pads that rest on the panel. The slide hammer will never do this.
“Do the thing you fear the most and the death of fear will follow” Ralph Waldo Emerson
A word about blending
Blending works best on a curved or rounded part of the panel.
We’ll cover why in a minute, but for now, take a look at fig. 3a.
This illustrates a dent on the upper curved portion of a door.
Fig. 3b shows how far you can walk one out with your knockdown. It is possible to make a small dent completely disappear with blending on a curve.
Notice that most of the action is along the curve and not so much up and down or across it. Picture it as trying to take a dent out of a pipe. Really the top of a door like this is a quarter pipe.
Here is the why part of blending.
Any time sheet metal has a curve it is resistant to change. A curved panel is a locked panel since its edges are welded to the car.
You are using the panels resistance to your advantage when blending. As you walk the low out with your knockdown, opposite reactions to your blows are working for you and actually vibrating the low back to level. It is best to start near the dent and work away from it. If you do it smoothly and avoid the divots, you can work dent after dent and never have to do a pull on them.
Yes, its a lot of blows, but you’ll get good at it really fast if you keep an eye on the panel and light reflection. A low light angle is best as you want to look across the plane or surface as much as possible.
If my neck hurts at the end of the day, I know my light was low enough.
Blending is still amazing to me and I use it every day.
You can try it on a flat panel, but usually you wind up with a spread out low spot. Flat panels are not resistant to change, so your tap downs really tap down.
However, this loops back to what we did to the dent in illustration 1b. Really, we blended it out, or tried to. So blending and smoothing can be the same thing.
If you make a pull and wind up with a nice dome, it will take multiple hammer blows to smooth it back out. You’ll watch the light and keep checking for where to strike next, but really you are blending the dome back down into the surrounding metal.
I hate glue pulling for the extra time it takes to work a dent. I love glue pulling as it the purest and most practical form of vibrating metal to restore it I’ve ever seen.
In the end, if you respect its limitations, you will work miracles from the top side.
Here are some tips you can use in successful glue pulling:
- Avoid divots
- Keep your knockdown holding hand up off the panel and rest only your wrist for stability. This will allow your eyes to see all around the tip of the knockdown.
- Try a big half dollar size tab with a small amount of glue. Try just a dab in the center. This will give a sharp pull in the center as the big tabs seem to hold better.
- Ambient temperature and humidity can affect the glue’s ability to stick. Try pulling sooner and if this doesn’t work, try letting it cool longer.
- The metal must be at least 65 degrees fahrenheit or the glue at the surface will cure too fast.
- The glue will usually stay on the car in a maximum pull. If the glue stays with the tab, your pull is not as effective as it could be. Try polishing the area of the dent with rubbing compound on a terry cloth towel. This will not only clean the area, it will give a “tooth” the glue can bite into.
- Sometimes the slide hammer is best, sometimes the mini lifter works better. Try them both.
- It is not necessary for the tab to “snap” off the car every time. There will be times when you just need to pick up a large low. One or two bumps with the slide hammer, or a gentle squeeze on the Mini Lifter will do. Alcohol will remove the tab.
- Avoid using denatured alcohol as it is dangerous to absorb through your skin. 91 % isopropyl alcohol is an excellent alternative.
- A particularly stubborn tab to remove can be helped off with a window wedge. Try to place wedge between glue and tab so as not to scratch paint surface.
- Watch out for corn rows or trenches. Just as you can work them toward the light in a dent pushed from underneath, you can do the same when knocking down a glue pull. Avoid this with cross checking or having another light source at a 90 degree angle to your main one. This will also reveal hidden creases which can block movement and prevent a clean flow of metal.
- Never glue pull where the paint is chipped. If the chip has been there long, moisture and heat have gotten underneath and you’ll likely pop paint off it. Ask me how I know this.
- Paint pulling off a factory paint job is rare, but it can happen. If you know glue pulling will be required, let the customer know the possible risk. If they balk, offer drilling as an alternative and get a signed release form signed to cover your assets.
till next time,
Tim Olson