|
|
|
Members Only Newsletter April 2005 |
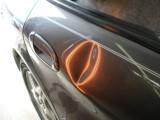
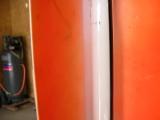
| Dear friends, there have been many of questions about the light that I use and how it works. I was trained using the striped light method and still believe this is one of the easiest ways to learn. If you have the Silver/Gold set of DVD's then you know I still start students off this way. The other method is the highly touted "fog board" or shadow method. What you see in the DVD's is actually a combination of both these methods. What I'd like for you to notice is how there really is no clear edge on the bulb in the reflection. This is the effect you are looking for in a light. It is this hybrid form of a fog board/reflector that allows me to see tool movement on the orange peel level. In the picture below can you see how much the light "falls" into this very deep dent? The old saying, "well begun is half done" really applies to dent work. With this light you can see movement very early and quick. |
|
|
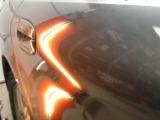
| Some have asked why I say "clocking" is an outdated method. Clocking is like a cane to a blind man. It is a way of stumbling around in the dark until you have raised the metal up enough where you can see your pushes. How you start out in a dent determines how it will look when you are done. I would rather help you see your pushes early in the game, no blind man's bluff in this training. Every dent has a unique shape to it's bottom. Many are a combination of creases and lows within a bigger looking dent. The dent will reveal to you where to push next. Listen to the metal and you'll never push blind. The key is to set your light in a position where you can see movement fast. Before any overpushing occurs. Most of this is due to the light's angle, or postion in relation to the car/dent. In the picture above, you can see there was a major difference in where the light was by how it shines in the bottom of the dent before. But a big help is a foggy shadow next to the bulb where the light gradually fades into the orange area of the reflector. You can see in the picture below how I have achieved this. |
|
|
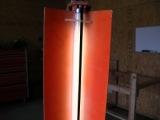
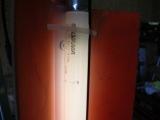
| The first two are pictures with the light turned on. Can you see the fuzziness? In the second picture you can start to see it is due to the white into orange spray method. With the light turned off in the third picture it is easier to see how the spray paint is applied. This reflector is made of aluminum and has just two bends in it. Do you see the way it is drilled and then zip tied to hold the bulb in? You only need to lose one bulb to want this safety feature. One of my students, Jon Redfern learned about bulb shadow in Spain in late 1999. He graciously shared it with me, and I tried it right away. I was using a dual bulb 4 footer at the time. I took out one bulb and lined the reflector with some aluminum flashing. This was riveted in place and painted white. I took the stripe completely off and used only this new shadow reflector. I noticed I could put the light lower and cast a shadow across the smallest of lows. I tried it on a hail job and liked what I saw until I put a striped light on it. The pushes looked good in the shadow light, but in the stripe I could see my pushes were not as "smooth" in the striped reflection. This is why I still use a combination of shadow/stripe. Best of both worlds. One of my students became so addicted to his reflector, we spent half a day restoring it. We were at the Dallas, Texas hailstorm and his light broke. I had an extra and it had the same style reflector on it but he could not use it. When we studied the difference in reflectors, we discovered the white into orange trick. You see, his reflector was shiny aluminum painted fluorescent orange. Over time the orange paint faded from the bulb out and made a really sweet gradient. Once we simulated that gradient we were back in business. You can experiment with this yourself. It is not necessary to get a new light. Simply modify the one you got. One student told me he uses the fluorescent green. This might be a good test. Tip: choose colors that are lighter as they are closer to white and less of a jump. |
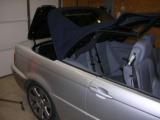
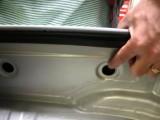
| Access tip of the month: BMW 3 series convertible
|
| With many convertibles you can place the top in a halfway open manner and discover access holes like these. Mercedes 500sl's have two 2 inch holes with rubber plugs in them, but they're under the carpet. No worries, just peel it back and reveal the holes. You can reglue the carpet after you're done. More on this one in the tools and access video. |
|
Tips on tips |
| Believe it or not, any bare steel tool will put a sharp push in metal no matter how fat it is. You will note in the tools and access DVD just how fat my biggest bar is. I use that baby for hail and it finishes out nicely. Don't worry too much about tips at first. You will quickly "own" all the info you need about tips as you experiment with each one. Try taping each tool and feel the difference from a bare, untaped tool. There are times when a sharper tip will be the best choice. Finishing out a sharp dent or hail for example. I have come to love the sharp pry bar in hail. I feel it's faster as it shrinks quicker due to the sharp tip. The opposite end of the spectrum is when you need a really fat tip. Large dents for example. Look for a creative use of a golf ball in the tools and access video. |
|
|
|
Finishing Your Work |
| All of today's cars are made using double sided galvanized steel. This zinc coating on both sides really slows rust. When we drill, we are exposing parts of metal that are not galvanized. Just placing a plug in this hole will not stop rust. I have pulled plugs out from previous PDR and found rust many times because the holes were unprotected.. I carry a touch up bottle with a brush built in containing self etching primer. Spies Hecker makes this one but most all paint lines have something like it. These kinds of primers are "zinc rich" and have acids that bond or etch the metal and won't let go. Some guys use "weld thru primer" by 3M and others. Same result. Next time you drill, paint some of this on the exposed metal of your hole, let it dry for a minute, then plug it. I have had repeat customers from years back and the holes were just like I left them with no rust. Cracked Paint In the "3 big dents" video, you heard me talk about cracking the paint on the Scion tailgate. I only use clear and no color on these spots. Most touch up looks awful and so I don't like it. Guess it's the old perfectionist painter in me. Besides it is not necessary or even helpful in the case of one tiny crack in the paint. The Scion customer would never have seen his unless I disclosed it to him. The process is really as easy as it sounds. Just drop a little clear on the crack and let it dry. That's it. If you need clear and can't find any, go to any VW dealer and ask for any color touch up they sell. You will get the color and bottle of clear as well. If you need a brush smaller than the one in the touchup bottle, tear a match out of a cardboard book of matches. Use the torn end as a small brush. Sanding and buffing After you have finished your repair sanding and buffing makes a nice finished job. This is only necessary when your pushes are really visible. It is possible to reduce the obvious pushes to the look of orange peel. Start with 2000 grit wet or dry sandpaper. It is safer to use wet, but I often cheat and use it dry on small areas. I have a small 3 inch buffer on my drill and use 3M's Microfinishing III compound, followed by their Microfinishing III Machine glaze as a polish. Be careful with swirl marks on dark cars. If you get these try using the Machine glaze by hand with a terry cloth towel. Make your movements across the panel as opposed to circular like the swirl marks. If your tool pushes are extremely high and pointed, you'll burn the paint off there almost as fast as Bruce Willis lost his hair. In these cases maybe better to not sand. I never introduce sanding and buffing to a student too early because I have seen many use it as a crutch for bad dent work. (The old body shop joke applies here: "What makes a good painter? 3M and Makita!") In cases where you are working a deep, stretched dent, sanding and buffing partway through the repair can be a big help. This way you can finish with a clean slate. |
| In conclusion I hope you enjoyed this month's newsletter. Special thanks to Mike Ramsey, Bernie Whalen, Zander MacDiarmid, Tom Montroy, and Chris Simpson for the good questions. Next month: look for a DVD of the Big'n in the picture at the top of this page. Richard Mason was with me and asked some great questions. Also more on lights and crushed body lines. Happy pushing, Tim Olson Please send questions and comments to tim@pdrsecrets.com |